Add members (distributed install)
Once you have set up and organized your installation, you are ready to add the members to it.
On the Add Member page, you can either add a new member or attach an existing member to your installation. Remember that each member of a distributed installation is completely independent. Members cannot interact with each other.
Add a new member
You will need, at the least, the following information: the member's customer number, MARC organization code, and Short name; which Follett products the member has purchased; and the SQL Server Administrator's password.
To add a new member
- After logging in, click the house icon adjacent to the installation name on the Update Members page of Setup.
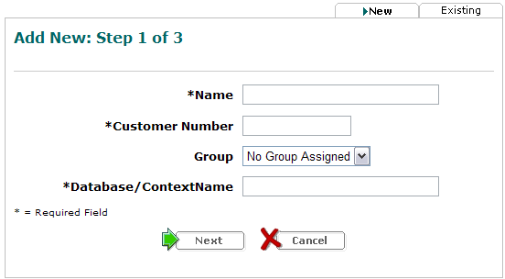
- Enter the required information in Step 1 on the New tab of the Add Member page that opens:

- Name: Enter the member's name as you want it to appear on the Welcome page. Each member must have a unique name.
- Customer Number: Enter the member's 7-digit customer number.
- Group: Optionally select the group to which the member belongs. You can make this assignment later, if you prefer.
- Database/Context Name: Provide a name for the member's database. The web server will also use this name. The database/context name can only contain alphanumeric characters and no punctuation other than the underscore character. Each database/context name must be unique.
- Once you have entered the necessary information, click Next.
- If prompted, enter the SQL Server Administrator's password.
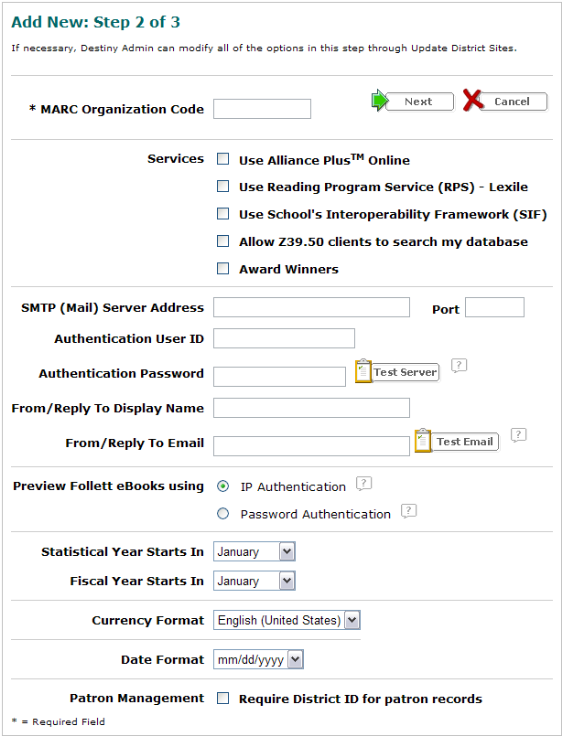
- In Step 2, you can set up additional information and services for the new member.
A Destiny Administrator can modify all of the options in this step later through Update District Sites. - Enter the MARC Organization Code (MOC) for this member. This is the only required information on the page.

- Once you have entered the necessary information, click Next.
- If prompted, accept the License Agreement.
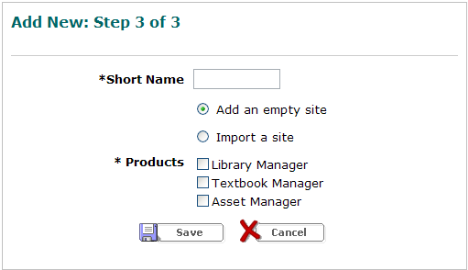
- In Step 3, choose whether you are adding a new member site or importing a site from Follett School Solutions, Inc. (Circulation Plus, Catalog Plus, TextLink) or Sagebrush (Athena, InfoCentre, Spectrum).

- Enter the Short Name for the member (10 characters maximum).
- If you are adding a new member site, select the appropriate products. Please note, once you save a site, you can add Products but not remove them. Please choose carefully.
If you are importing a site, browse for and select the .ALL file created by the extraction utility (500 MB maximum), and then select the way Destiny is to handle any duplicate records. - Once you have specified all the necessary information, click Save.
You can access any member of your distributed installation and perform all administrative tasks while logged in as a Super Administrator.
Attach an existing member
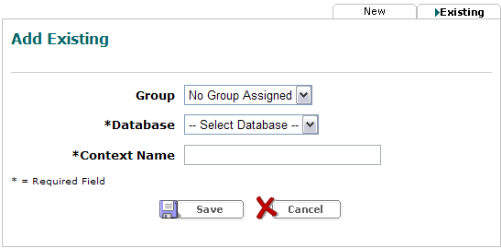
If there are sites that are currently running their own installation of Destiny, it is possible to turn them into members through the Existing tab of Add Member.
Note: If there are existing members that you wish to add, but the Existing tab indicates No unassigned databases detected, one or more of the following may be the cause:
- The database has not been attached to SQL Server.
- The database user has not been updated.
- The Destiny version of the database does not match the distributed installation's version.

- Group: Optionally select the group to which the member belongs. You can make this assignment later, if you prefer.
- Database: Choose the name of the member's database that you want to add.
- Context Name: Enter the context name assigned to the selected database or specify a new one. The web server uses a context name to identify each member. Typically, the context name is the same as the database name. The context name can only contain alphanumeric characters and no punctuation other than the underscore character. Each context name must be unique.
If you attached an existing member to your installation, the site is ready to use immediately.